
Building your own fence can be a rewarding project, offering both privacy and an aesthetic upgrade to your property. For residents of Leeds, this guide will walk you through the steps needed to construct a sturdy, attractive fence. Whether you’re looking to increase security, mark property boundaries, or simply enhance your garden’s look, this comprehensive guide will help you achieve your goal.
Tools and Materials You’ll Need
Before diving into the construction process, gather all necessary tools and materials. Here’s a list to get you started:
Tools:
- Tape measure
- Post hole digger
- Level
- Hammer
- Circular saw or handsaw
- Screwdriver or drill
- Shovel
- String line
- Carpenter’s pencil
- Safety gear (gloves, goggles, ear protection)
Materials:
- Fence posts (wood, metal, or vinyl)
- Fence panels or pickets
- Concrete mix
- Nails or screws
- Gravel
- Protective sealant (for wooden fences)
- Gate hardware (if installing a gate)
Step 1: Planning and Preparation
- Determine the Fence Line:Begin by marking your property line to ensure your fence doesn’t encroach on your neighbour’s property. Use a tape measure and stakes to outline where your fence will go. Stretch a string line between the stakes for a straight guide.
- Check Local Regulations:Leeds has specific regulations and permit requirements for fence construction. Visit your local council’s website or office to understand the height restrictions, setback requirements, and any other relevant guidelines.
- Choose Your Fence Type:Decide on the type of fence you want. Common options include wooden picket fences, metal fences, and vinyl fences. Each type has its own benefits and aesthetic appeal, so choose one that suits your needs and complements your property.
Step 2: Measuring and Marking
- Measure Your Posts:Typically, fence posts are spaced 6 to 8 feet apart. Measure and mark the positions for each post along the string line. Use spray paint or stakes to mark the spots.
- Calculate Materials:Determine how many posts, panels, or pickets you’ll need. Purchase a bit more than your calculations to account for errors or damage.
Step 3: Digging Post Holes
- Start Digging:Use a post hole digger to dig holes at each marked spot. The depth of the holes should be about one-third the height of the posts, plus an extra 6 inches for the gravel base. For example, for a 6-foot fence, dig at least 2.5 feet deep.
- Add Gravel:Pour 6 inches of gravel into the bottom of each hole for drainage. This helps prevent water from rotting wooden posts and provides a stable base.
Step 4: Setting the Posts
- Position the Posts:Place a post in each hole. Use a level to ensure they are straight vertically and horizontally.
- Mix and Pour Concrete:Prepare the concrete mix according to the instructions on the bag. Pour it into the hole around the post, filling it up to ground level. Use a shovel to tamp down the concrete and eliminate air pockets.
- Allow to Set:Let the concrete set for at least 24 hours before attaching the fence panels or pickets. This ensures the posts are securely anchored.
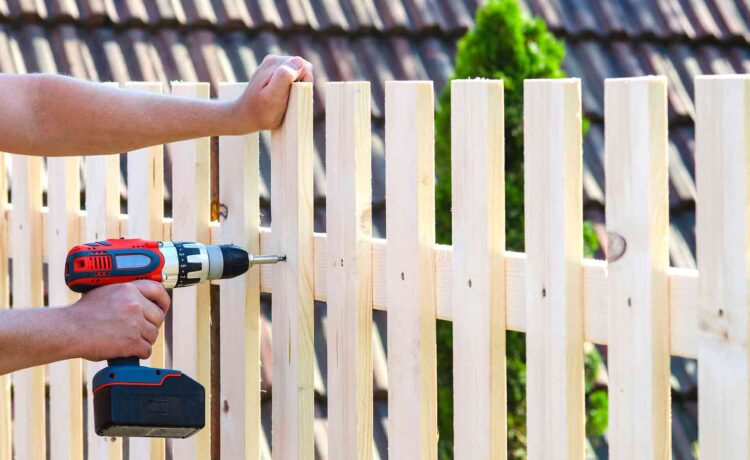
Step 5: Attaching Fence Panels or Pickets
- Measure and Cut:Measure the distance between each post and cut the fence panels or pickets to fit. Ensure your cuts are straight for a professional look.
- Attach Panels or Pickets:For panels, align them between the posts and secure them using nails or screws. For pickets, start at one end and work your way to the other, attaching each picket to the horizontal rails with nails or screws. Use a level to keep them even.
- Maintain Even Spacing:If using pickets, ensure even spacing between each one for a uniform appearance. A spacer block can help achieve consistent gaps.
Step 6: Installing the Gate
- Position the Gate:Choose the location for your gate, typically at a convenient access point. Measure the opening to ensure it’s wide enough for your needs.
- Install Gate Posts:Gate posts should be sturdier than regular fence posts, as they bear more weight and stress. Dig deeper holes and use extra concrete for these posts.
- Hang the Gate:Attach the gate hardware to the gate and posts. Ensure the gate swings freely and latches securely.
Step 7: Finishing Touches
- Apply a Protective Sealant:If you’ve built a wooden fence, apply a weatherproof sealant to protect it from the elements. This extends the life of your fence and maintains its appearance.
- Check for Stability:Walk along your fence, gently pushing against each section to ensure everything is secure. Make any necessary adjustments.
- Clean Up:Remove any debris, excess materials, and tools from the work area. Dispose of waste responsibly.
Maintenance Tips
- Regular Inspections:Periodically check your fence for any damage or wear. Tighten loose screws, replace broken pickets, and reapply sealant as needed.
- Cleaning:Keep your fence clean by removing dirt, debris, and mildew. Use a mild detergent and water for cleaning, and a power washer for tougher grime.
- Vegetation Control:Trim plants and grass around your fence to prevent moisture buildup and rot.
Conclusion
Building your own fencing in Leeds can be a satisfying and cost-effective project. By following these detailed steps and using the right tools and materials, you can construct a fence that enhances your property’s privacy, security, and aesthetic appeal. Remember to adhere to local regulations and take your time to ensure a high-quality finish. Happy fencing!


